
Are you trying to keep your ChatGPT chatbot up to date with the latest information from the web, but just can’t seem to figure it out? Say no more!
In this guide, we’ll walk you through the process of enabling the Browse with Bing plugin, a powerful tool that allows ChatGPT to search the internet in real-time.
And note, this isn’t using one of the unofficial plug-ins available for ChatGPT either. This is the only (as of time of this writing) way to have ChatGPT connect to the internet while you’re actually using the Chatbot tool.
So without further adieu, let’s get your ChatGPT supercharged!
For the broader learning path, visit our parent guide.
What is the ‘Browse with Bing’ Feature in ChatGPT?
Before we dive into the nitty-gritty of the process, let’s first understand what this feature really is. The ‘Browse with Bing’ feature is a native plugin (you don’t have to install it) available exclusively to ChatGPT Plus users, the upgraded subscription plan where you pay $20 a month to use it.
It essentially allows ChatGPT to scour the internet using Bing (not Google) for the most current data to answer your queries more accurately. And of course, it has it’s pros and cons, but we’ll discuss that later.
How Does ‘Browse with Bing’ Improve ChatGPT’s Functionality?
Wondering how ‘Browse with Bing’ enhances your interaction with ChatGPT? By enabling this feature, your chatbot can perform real-time searches on Bing to find relevant, up-to-date information outside its training set. For the most part, ChatGPT uses information that it collected before the end of 2021. So having live internet access is a great addition to the already amazing software.
Best of all, the process is entirely transparent, meaning you can see the search results and sources ChatGPT uses to formulate its responses in real-time.
How Can I Enable ‘Browse with Bing’ in ChatGPT?
To supercharge your ChatGPT with the powerful ‘Browse with Bing’ feature, follow the steps outlined below. Don’t worry; we’ve made the process as straightforward as possible. Remember, the ‘Browse with Bing’ feature is exclusive to ChatGPT Plus users, requiring a $20/month subscription.
#1. Visit the official website at chat.openai.com. Once you’re there, enter your login credentials and access your account.
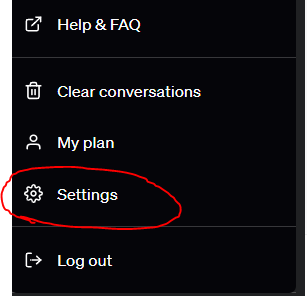
#2. After logging in, look at the navigation menu on the bottom left side of the page. Here, locate the ‘three-dot menu’ (represented as ‘…’) next to your email address. Clicking on it will reveal a drop-down menu.

#3. From the drop-down menu, select the ‘Settings’ option. Upon clicking, an overlay window will pop up on your screen displaying various settings related to your account.
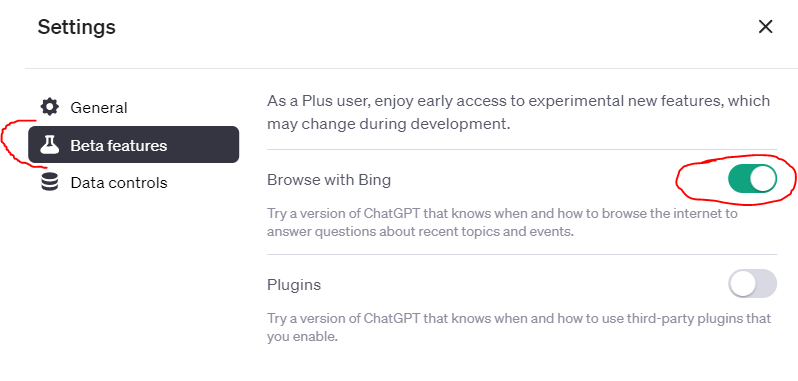
#4. From the list of options on the left, find and click on ‘Beta features.’ This will lead you to a page displaying all the beta features available for ChatGPT Plus users. Now click the “Browse with Bing” toggle so it flips green like below.
Congratulations! You’ve successfully enabled the ‘Browse with Bing’ model in your ChatGPT. Now let’s put it to use.
How to Use ‘Browse with Bing’ in ChatGPT?
Now that you’ve activated the ‘Browse with Bing’ plugin, it’s time to learn how to use it effectively. Follow the instructions below to use this newly enabled feature:
- Start by initiating a new chat. To do this, click on the ‘New Chat’ button from the left menu.
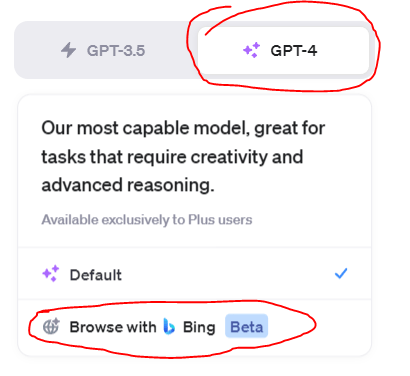
- Once you’re in the new chat interface, hover over the ‘GPT-4’ tab. A menu will pop up, showing you the available models.
- From this menu, select ‘Browse with Bing.’ This will change your active model to the ‘Browse with Bing’ model, connecting your ChatGPT to the internet.
Now, whenever you pose a query that requires internet access, the plugin will get into action. You’ll notice that the chatbot will browse the internet for the most relevant and updated information to provide an accurate response.
For instance, if you ask ChatGPT about a recently announced feature or a recent event, it will use Bing to search for the information and then (hopefully!) provide you with an informed answer.
The Caveats of Using ‘Browse with Bing’
While ‘Browse with Bing’ is indeed a potent feature that enhances ChatGPT’s abilities, it does come with its own set of caveats.
Firstly, you’ll find that ChatGPT takes noticeably more time to generate responses when using this feature. This is because it has to issue a search on Bing, analyze the results, and then formulate a response. While this ensures a more accurate and informed response, it does add to the response time.
I’ve had some queries take almost 5 minutes!
Secondly, the plugin exclusively uses Bing for all its searches. Whether this is a strength or a weakness depends on your personal preference. Bing does offer comprehensive search results; however, it might not always be as thorough or as accurate as other search engines.
Lastly, there will be occasions when ‘Browse with Bing’ returns an error.
This can happen due to a range of reasons – from server-side issues to a poor internet connection on your end. While this can be frustrating, keep in mind that the feature is still in its Beta phase. These glitches are likely to get ironed out as the feature gets updated and improved upon.
In any case, if you’re already a paid subscriber to the ChatGPT Plus plan, you might as well spend the 30 seconds turning on this functionality and see if it’s right for you.
Happy prompting!