
Most people do not pick the wrong AI image tool because they are careless. They pick the wrong one because they compare pricing like they are shopping for storage bins on Amazon instead of choosing a tool that is about to sit inside their workflow every week.
So they grab the cheapest plan, or the most famous tool, or the one with the prettiest pricing page, and then act surprised when they burn through credits, hit licensing confusion, or realize the tool is great for fantasy portraits and terrible for the actual work they need done.
That is the real issue behind a lot of bad AI Image Tool Comparisons Pricing Fit Mistakes That Lead to Bad Tool Picks. The problem usually is not price alone. It is mismatch. Bad fit dressed up as a smart savings decision.
This article will help you compare AI image tools more usefully, so you can stop choosing based on shallow pricing math and start choosing based on output quality, usage patterns, commercial reality, and the kind of work you actually do. Not the kind of work you imagine yourself doing after watching one too many tool demos.
For the full path around this topic, head to the parent guide.
Why pricing mistakes happen so often
AI image tool pricing is rarely as simple as “cheap” versus “expensive.” The pricing page might show monthly plans, yearly discounts, credit bundles, generation caps, team seats, commercial terms, editing features, upscale limits, private mode, API access, or usage restrictions that only become obvious after you have already paid.
And because many of these tools look similar from the outside, people compare the visible price instead of the actual cost of getting the outputs they need.
That is how someone ends up paying less per month for a tool that takes three times longer to get one usable image. Very frugal. Extremely inefficient.
If you need a broader comparison foundation first, start with AI image tool comparisons and then come back with sharper eyes.
Mistake 1: Comparing subscription prices without comparing output volume
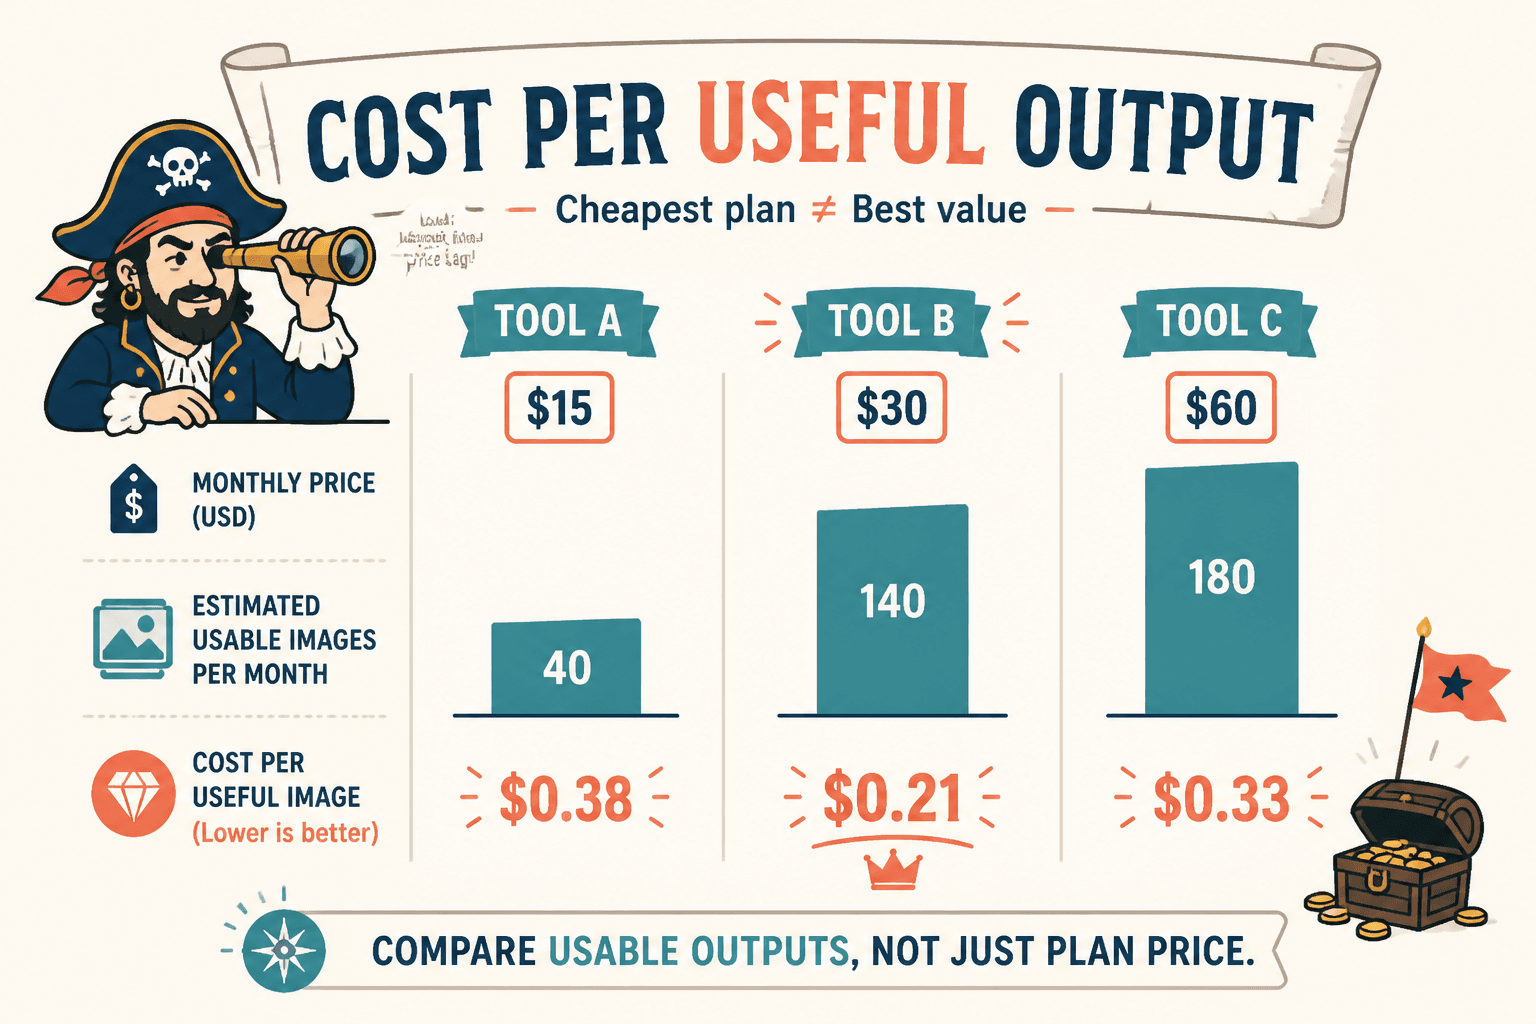
A $10 plan is not cheaper than a $29 plan if the $10 plan gives you so few generations, edits, or high-resolution exports that you end up stuck halfway through the month.
This is one of the most common pricing-fit mistakes. People compare the monthly number and ignore how many serious attempts they can make before running into limits.
What to compare instead
- How many images or credits you get per month
- How many credits a typical generation uses
- Whether variations, edits, inpainting, or upscaling cost extra
- Whether “fast mode” and “relaxed mode” affect practical usage
- How many usable images you usually get from 20 prompts, not just how many total images the tool spits out
If one tool gives you 500 chances to iterate and another gives you 80, the monthly fee means very little by itself. Creative work is iterative. Your first prompt will often be wrong. Your second may be less wrong. Your fifth is where things start getting useful.
So compare cost per useful output, not cost per plan.
Mistake 2: Ignoring your actual use case
Not every AI image tool is trying to do the same job. Some are stronger for marketing graphics. Some are better for concept art. Some are better for product mockups, scene generation, stylized portraits, ad creatives, or image editing.
People make bad picks when they compare tools in general instead of comparing them for their specific use case.
Examples of mismatched buying
- A coach buys a tool built for dramatic art styles when they really need clean branded thumbnails and lead magnet visuals
- A consultant pays for a premium plan but only needs occasional blog header images
- A creator chooses the cheapest option, then realizes the editing controls are too weak for iterative client work
- A solo founder picks a tool with flashy image generation but poor consistency for ad variants
Before comparing pricing, write down what you actually need the tool to produce. Not “images.” That tells you nothing useful. Be specific.
- Social graphics
- Blog illustrations
- YouTube thumbnails
- Ad concepts
- Product visuals
- Moodboards
- Character art
- Brand-consistent assets
- Quick drafts for clients
- Editable images for ongoing campaigns
If you want help filtering tools by real needs instead of vibes, this guide to finding the right fit is worth your time.
Mistake 3: Assuming the cheapest plan is the safest starting point
Cheap feels low-risk, but it can create the wrong kind of friction.
If the cheapest plan is too cramped for meaningful testing, you do not actually learn whether the tool fits. You just learn that trying to evaluate a creative tool with one hand tied behind your back is annoying.
A tiny plan can be useful if you already know what you want and just need light usage. But if you are still evaluating prompt quality, output consistency, controls, and editing flow, the cheapest plan may not give you enough room to judge the tool fairly.
Better approach
- Estimate your first-month testing volume
- Assume you will waste prompts while learning
- Choose a plan that supports proper evaluation, not just symbolic access
- Cancel fast if the fit is wrong
This matters even more if you are comparing on limited budget. If that is your situation, read how to compare AI image tools on a small budget. Saving money is good. Fake saving that leads to a second purchase next week is not.
Mistake 4: Not checking what counts as commercial use
Some people pick a tool based on price, make client assets or business visuals with it, and only later realize the plan they chose has restrictions around commercial use, ownership, attribution, privacy, or public generation visibility.
This is where “cheap” can get expensive in a hurry.
If you are creating assets for your business, audience, products, client work, paid campaigns, course materials, or brand visuals, commercial terms matter just as much as output quality. Maybe more.
Check these before you pay
- Are commercial rights included on your plan tier?
- Can client work be created under that license?
- Are images public by default?
- Is private generation locked behind a higher plan?
- Are there restrictions on resale, packaging, print use, or ad use?
- Does the provider reserve broad rights over your outputs?
You do not need to become a licensing lawyer overnight. You do need to stop treating terms as decorative text under the pricing boxes.
For a faster decision framework, use this commercial use comparison guide.
Mistake 5: Paying for features you will never touch
Premium plans often include things that sound impressive but do not matter to your workflow. Team collaboration. Advanced batch operations. API access. Priority queues. Massive generation caps. Exotic style controls. White-label options. Fine, great, lovely.
But if you are a solo creator making a few campaign visuals a week, you may be paying for enterprise-flavored garnish.
Feature-heavy pricing can make a plan look more valuable than it is for your needs. A tool is not a better buy because its pricing page is dressed like a luxury buffet.
Ask this instead of “What does the top plan include?”
- What features do I use weekly?
- What features save me meaningful time?
- What features improve output quality, not just add options?
- Would I notice if this feature disappeared tomorrow?
If the answer is no, that feature probably should not be steering your purchase.
Mistake 6: Underestimating the cost of bad editing controls
Many people compare image tools as if generation is the whole job. It is not. The real work usually happens after the first output appears.
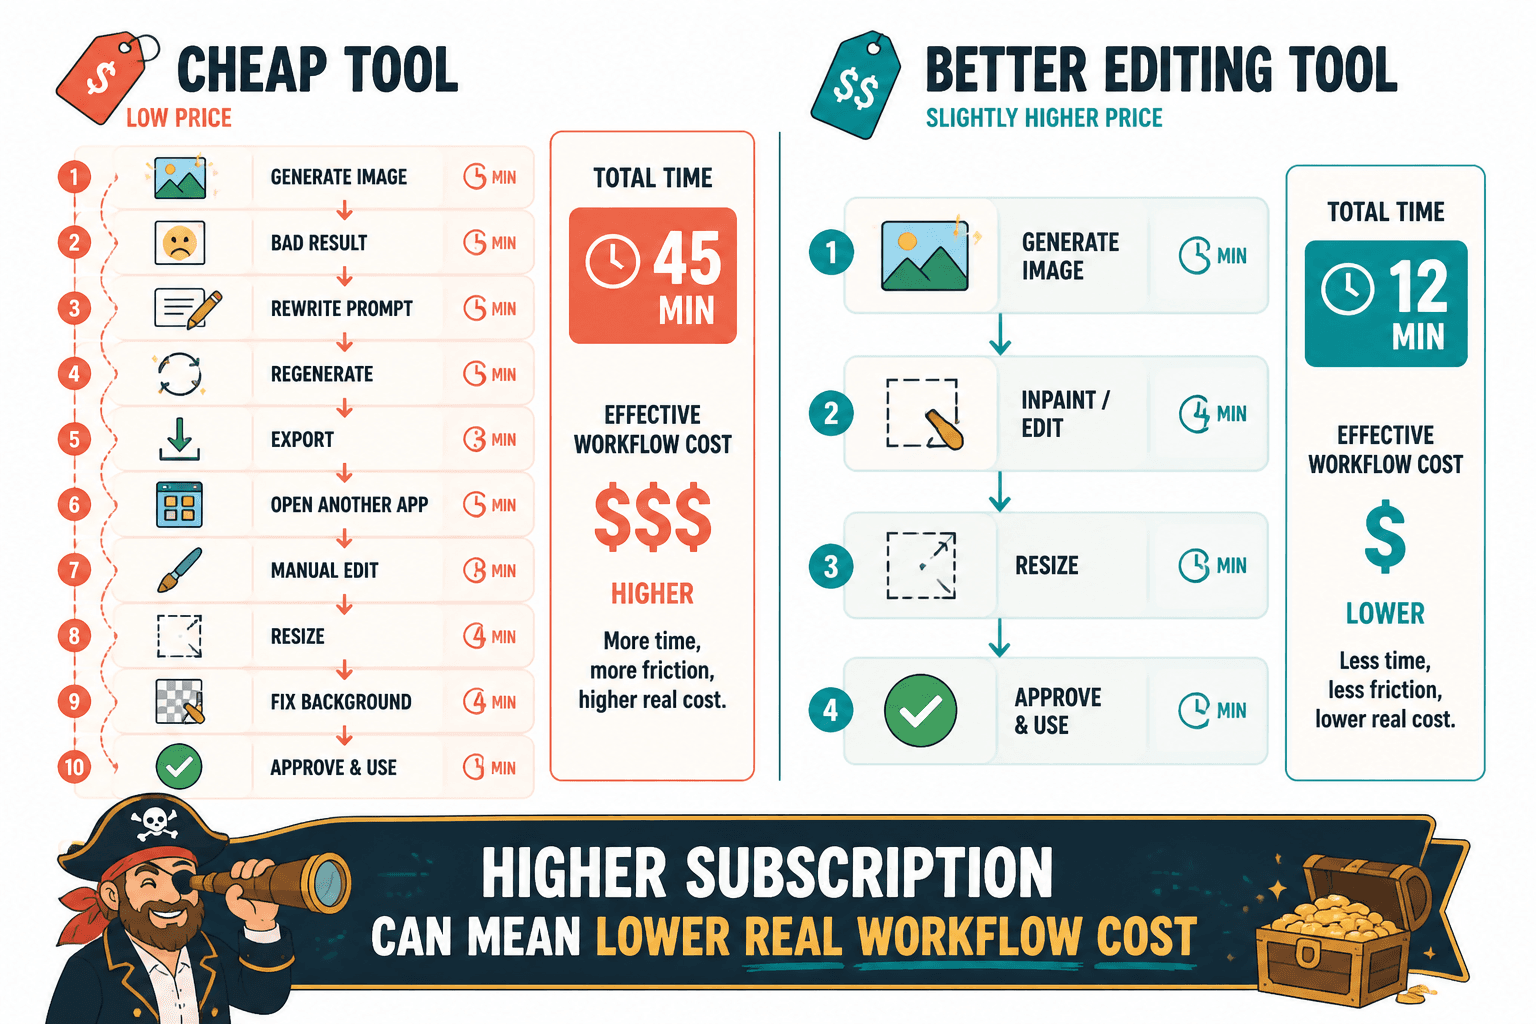
You need to refine. Regenerate sections. Adjust composition. Fix hands, text, backgrounds, proportions, product details, colors, and brand consistency. If a tool is cheap but miserable to edit in, the total cost includes your time, your frustration, and the extra software you now need to patch the result.
This is one of those areas where a slightly more expensive tool can be dramatically cheaper in real use. Better editing controls often mean fewer dead ends, fewer exports into other apps, and fewer rounds of “close enough, I guess.”
Useful editing questions
- Can you edit part of an image without remaking the whole thing?
- How good is inpainting or object replacement?
- Can you maintain style consistency across variations?
- Can you easily resize for different platforms?
- Does it support reference images or brand-guided outputs?
Cheap generation with clumsy editing is how people accidentally build a very expensive workflow.
Mistake 7: Treating time cost like it is free
This one gets ignored because subscription numbers feel concrete and time feels squishier. But if one tool takes you 45 minutes to get a usable visual and another takes 12, that difference matters.
Especially if you publish often, work with clients, or create campaign assets in batches.
When evaluating pricing fit, include:
- Time to learn the interface
- Time to get a usable first draft
- Time to iterate to final quality
- Time spent exporting, resizing, or moving files elsewhere
- Time spent rewriting prompts because the tool is inconsistent
Sometimes the right choice is not the cheapest plan. It is the tool that gets you to “good enough to publish” without a dramatic emotional subplot.
Mistake 8: Buying for aspirational scale instead of current reality
A lot of people buy AI tools for the business they hope to have six months from now. That sounds ambitious, but it often leads to bloated software stacks and plans that solve problems you do not have yet.
If you currently make two blog graphics a week, you do not need to buy as if you are running a full creative team shipping fifty ad variants a day. You need a tool that fits your current publishing rhythm, not your future TED Talk about operational scale.
There is a difference between buying with room to grow and buying like a confused mid-market department.
A better pricing-fit lens
- What do I need this month?
- What will I likely need in the next 90 days?
- What usage level would justify upgrading later?
- Can I start lean and expand without painful migration?
If you are a solo creator, consultant, or small team, this grounded way of comparing matters a lot. This guide on what matters for solo creators goes deeper on that point.
A practical way to compare AI image tool pricing before you buy
If you want to avoid bad tool picks, stop asking “Which one is cheapest?” and start asking “Which one creates the best value for my actual work?”
Use this simple comparison process.
1. Define the job
Write down the 2 to 4 image tasks you need most often.
- Weekly social graphics
- Blog illustrations
- Client concept images
- Ad creative testing
2. Estimate monthly usage
Do not guess vaguely. Estimate rough volume.
- How many final images do you need?
- How many drafts or prompt attempts does one final image usually require?
- How many edits and variations are normal for your process?
3. Compare plan limits to real workflow
Map pricing to actual usage. This is where most bad comparisons fall apart.
| Comparison point | What to check |
|---|---|
| Monthly cost | Base fee, annual discount, extra credit costs |
| Output volume | Generations, edits, upscale limits, queues |
| Usable quality | How often outputs are actually worth keeping |
| Editing workflow | Inpainting, resizing, consistency controls |
| Commercial terms | Business use, client use, privacy, ownership |
| Time cost | Prompting effort, iteration speed, export friction |
4. Test with the same prompts
Use a small but realistic prompt set across tools. Not random experiments. Real work prompts.
For example:
- A branded social post visual
- A blog header illustration
- A product-style mockup
- An edited variation of a previous image
5. Score the tool on fit, not hype
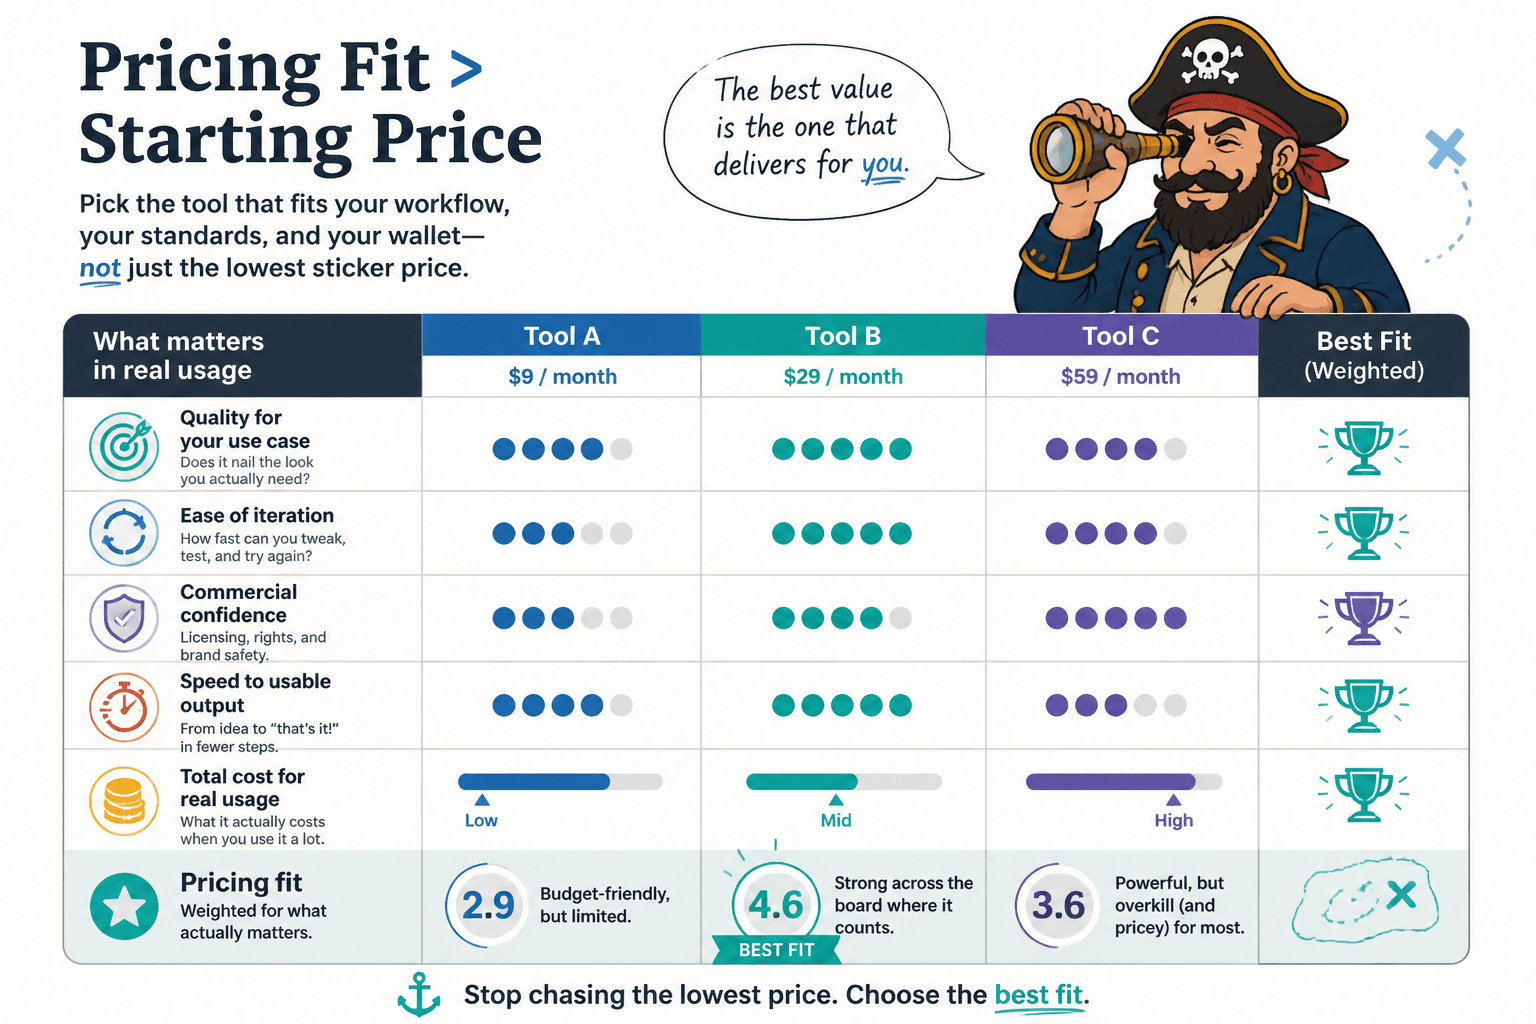
After testing, rate each tool on:
- Quality for your use case
- Ease of iteration
- Commercial confidence
- Speed to usable output
- Total cost for your real usage
That gives you a much cleaner decision than “this one had a lower starting plan and the landing page looked expensive.”
What good pricing fit actually looks like
A good pick usually looks boring in the best way. The tool fits your weekly output needs. The pricing feels proportionate. You are not constantly hitting caps. The editing flow is manageable. The commercial terms are clear enough. You can produce what you need without inventing a whole side job in workaround management.
That is the thing people miss in AI image tool comparisons. The best tool is not the one with the loudest feature list or the lowest sticker price. It is the one that reliably supports your kind of work at a cost that makes sense after you include quality, speed, and usage reality.
If you want a wider category view, you can browse the broader AI writing tools and AI image tools comparison hub and then narrow from there.
Quick FAQ
Should I always start with a free plan?
Only if the free plan is enough to test real use cases. If it is too limited to judge quality or workflow, it may waste more time than it saves.
The bigger point is simple: clearer structure and clearer writing make the piece more useful. That is usually what makes the ending land better too.