
When it comes to using the OpenAI API, the documentation provided by OpenAI is super informative and detailed. However, it does assume that readers already have some knowledge of Python programming. But don’t worry, I’ve got you covered!
This guide is specially crafted to help bridge the gap for people with no prior Python experience. I’ll walk you through the whole process, starting from installing Python to making your first request to the OpenAI API. Whether you’re new to programming or just getting started with Python, this guide will give you all the steps you need to successfully interact with the OpenAI API.
If you came here just because you are getting a openai.error.AuthenticationError, you can probably just skip ahead to the code section.
The whole process should take less than an hour. So, let’s jump right in!
Want the broader roadmap? Start with the parent guide.
Installing Python to Use with the ChatGPT API
To get started with utilizing the OpenAI API, the first step is to install Python and choose an appropriate code editor. Let’s explore the installation process and recommended editors for different operating systems.

Windows
The first, and easiest, option is to install Python from the official Python website. To begin, visit the official Python website at and navigate to the Downloads section. From there, select the latest stable version of Python that is compatible with your Windows system architecture (32-bit or 64-bit). Once you have downloaded the installer, run it and follow the on-screen instructions to complete the Python installation on your Windows machine.
Alternatively, you can be a nerd and use the Linux subsystem and its version of Python on Windows. Start by installing a Linux subsystem like WSL (Windows Subsystem for Linux). You can find instructions specific to the Linux distribution you prefer. Once the Linux subsystem is set up, you can install and utilize the Linux version of Python on your Windows system.
Code editor
When it comes to choosing a code editor, you have several options:
- Idle: Idle is Python’s default Integrated Development Environment (IDE) and is included in the official Python installation. It provides a basic, user-friendly environment for writing and running Python scripts.
- PyCharm: PyCharm is a widely-used Python IDE developed by JetBrains. It offers a comprehensive set of features, including code highlighting, debugging tools, and code completion.
- Visual Studio Code: Visual Studio Code (VS Code) is a popular and versatile code editor that supports multiple programming languages, including Python. It provides a wide range of extensions and customization options to enhance your Python development experience.
- Vim: For those comfortable with command-line editing, Vim is a powerful and highly configurable text editor that can be accessed through the Linux terminal in the subsystem.
Choose the editor that best suits your preferences and workflow.
macOS
macOS typically comes with a pre-installed version of Python; however, it is often an older version. So, you should download the latest version of Python from the official Python website, as mentioned in the previous section for Windows.
While it is possible to replace the Python version that comes with macOS, it can be a more complex task. Therefore, it is generally recommended to install a separate version of Python instead of replacing the system version.
Regarding code editors, the recommended editors mentioned earlier for Windows, such as Idle, PyCharm, Visual Studio Code, and Vim, work well on macOS as well. These editors provide a consistent and reliable coding environment across different operating systems. You can choose the editor that suits your preferences and offers the desired features for Python development on macOS.
iPadOS / iOS
If you’re using an iPad or iPhone for this tutorial, you can use an app called “a-shell,” which serves as a stripped-down terminal emulator. With a-shell, you can access a current version of Python and the Vim editor for editing your Python code.
a-shell provides a convenient way to interact with the terminal on your iOS device and enables you to execute Python commands and scripts. It offers a straightforward interface for running Python code and experimenting with the OpenAI API. If anyone sees you using it in a coffee shop they will think you are a hacker. It’s a feature, not a bug?
You can install a-shell from the App Store. However, if you go the mobile device route, you should seriously consider using some type of physical keyboard.

Linux
If you are using Linux, why are you reading this section? You can just skip ahead to the code.
ChromeOS
If you are using ChromeOS, I can’t help you, but you should be used to figuring things out on your own by now. Also, purple crayons are my favorite flavor too.
Is a Virtual Environment Necessary for the ChatGPT API
When working with Python, it is highly recommended to utilize virtual environments. Virtual environments provide a controlled and isolated environment for your Python projects, allowing you to manage dependencies and package versions effectively. They are particularly important when working on multiple projects or collaborating with others.
In a nutshell, if you are using a virtual environment and you break Python somehow, you can just throw that enviroment in the trash and start a new one.
However, for the purpose of this article, we will not delve into virtual environments in detail. While virtual environments are essential to understand and utilize for a comprehensive Python development workflow, our focus in this article is primarily on getting started with the OpenAI API to generate that sweet AI text.
Installing the OpenAI Library
In Python, libraries are collections of pre-written code that provide additional functionality to your programs. They contain modules, which are Python files that contain functions, classes, and variables designed to perform specific tasks. Libraries are essential for leveraging existing code and accelerating development by reusing code written by others.
To install libraries in Python, we can utilize a package manager called pip. Pip is a command-line tool that allows you to easily install, upgrade, and manage Python packages from the Python Package Index (PyPI). It simplifies the process of fetching and installing libraries, saving you time and effort.
To install the OpenAI library using pip, open your preferred command-line interface (e.g., Terminal on macOS or Command Prompt on Windows) and run the following command:
pip install openaiThis command instructs pip to fetch the OpenAI library from PyPI and install it on your system. Ensure that you have an active internet connection during the installation process. Pip will handle any necessary dependencies and install the OpenAI library and its dependencies in your Python environment.
When I installed it on my iPad in a-shell it looked like this:

Generally speaking, if you see a lot red text, something went wrong. Please leave a comment below and I’ll try to help.
Once the installation is complete, you can begin using the OpenAI library in your Python programs to interact with the OpenAI API and explore its capabilities.
Code to Make the ChatGPT Example Program Work
To make a request to the OpenAI API, you need an API key provided by OpenAI. Follow the steps below to obtain an API key:
- Visit the OpenAI website at https://openai.com.
- Navigate to the API section and sign in to your OpenAI account (or create a new account if you don’t have one).
- Once logged in, go to the API dashboard to manage your API keys.
- Generate a new API key by following the provided instructions.
- Copy the generated API key and securely store it in a safe location.
It is crucial to keep your API key private and avoid sharing it with others. The API key grants access to your OpenAI resources, including any associated usage costs. Treat your API key like a sensitive credential and ensure it is kept confidential to prevent unauthorized access or abuse.
Below is an example of Python code similar to what you can find in OpenAI’s official documentation:
import os
import openai

openai.api_key = os.getenv("WHAT_THE_HECK_IS_AN_ENVIRONMENT_VARIABLE")

response = openai.Completion.create(model="text-davinci-003", prompt="Bonjour world!", temperature=0, max_tokens=7)
If you used the text editor you installed earlier to save the code above into a file and then ran it with Python, congratulations! You probably saw a lot of errors. Now you know what a Python script throwing an error looks like. Remember, failure is just nature’s way of highlighting the things you suck at.
Remember up above when I mentioned virtual environments? I was talking about virtual Python environments, but there are other types of enivronments.
On line four of the code snippet above, a method called os.getenv() is called. A good way to store sensitive information that you don’t want to share with others is keep them in system environment variables. Unfortunately, we didn’t do that here and how to do it varies from OS to OS (read I don’t feel like explaining how to do it), so let’s just do it the sloppy way.
Open the editor you installed before and paste this code in it:
import openai

#encoded with base64, this is just a joke, you should never post your API key online
openai.api_key = "eW91IGNhbiBiaXRlIG15IHNoaW55IG1ldGFsIGFzcw=="

response = openai.Completion.create(model="text-davinci-003", prompt="hello world!", temperature=0, max_tokens=17)

print(response["choices"][0]["text"])
What? You saved and run the code already? Congratulations on seeing some more errors. Remember earlier when I showed you how to get that API key? You need to erase everything inside the quotation marks on line four and replace it with your API key.
Then save your file and run it. If you don’t know how to do that, Google how to do it, or check back here later when this entire sentence will be replaced with another sentence that contains a link to my article that guides you through running Python scripts.
When I run the script on my iPad, it looks like this:
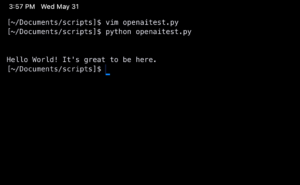
If you made it this far, there is at least some aura of noob around you. So please don’t color me pedantic when I explain that when learning a new programming language, tradition says the first program you make is “hello world”. It’s usually a short program just to learn enough about the syntax of the language to print “hello world” on the screen.
But with OpenAI, we prompted it with “hello world” and it continued the thought. Next time, we will prompt it to provide a joke to end this article, or even better…
Why doesn’t the example Python program from OpenAI’s documentation work?
Python gives an AuthentificationError
If you copied the code from OpenAI’s guide, pasted into a file on your computer, ran it with Python, and then got an error, it’s probably because it can’t find your API key. The example code is asking your OS for the key, but you never gave the key to your OS.
The easiest way to fix this is to put your key directly in the Python script and take out the part where it asks your OS for the key (the os.env part). Remember, don’t share your key with anyone.
Nothing happens when I run the OpenAI API program
On the other hand, you might run Python script and nothing at all happens. This is because in the example program provided by OpenAI, they simply send a request and store it in a variable. Then the program ends.
If you want to see what’s inside the repsonse, you need to print it. The variable is named response, so you can just add print(response) to the end of your script. However, this will print all of the response. If you just want the text part, check out what I did in the code above.
What’s Next
The code provided in the previous section utilizes the “davinci” GPT model, which is a powerful language model developed by OpenAI. However, it’s important to note that OpenAI has released newer models, such as GPT3.5, which may require slight modifications to the code in order to interact with the different API endpoint.
In the next article, we will delve into GPT3.5 and explore its features and capabilities. We will cover how to adapt the code to work with the GPT3.5 model and its specific endpoint. Additionally, we will dive deeper into advanced topics related to using the OpenAI API, including working with different API parameters, managing API rate limits, and handling larger-scale language generation tasks.
By following this guide, Python beginners will have a solid foundation for utilizing the OpenAI API and exploring the potential of language models. Stay tuned for the next article, where we will continue our journey and expand our knowledge of OpenAI’s advanced models and techniques.
In the meantime, feel free to experiment with the provided code and explore the possibilities of the OpenAI API. The OpenAI documentation and resources are valuable references for further exploration and understanding. Enjoy your journey into the world of AI-powered language generation with OpenAI!
You might also want to know what ChatGPT actually means or how Artificial General Intelligence works.