
A draft is open in one tab, research notes are scattered across three others, the outline is still living in a half-finished doc, and the “final” version keeps getting smaller every time the editing pass removes another weak claim. That is not a writing problem. It is a toolchain problem. The useful question is not whether to use AI for LinkedIn articles, but which tools help you move from rough idea to publishable article without turning every handoff into a small administrative tragedy.
This guide focuses on the tools that actually earn their place in a lean workflow: research tools, drafting tools, editing tools, templates, and repurposing tools. The goal is not a shiny stack. It is a system that helps you write something clear, specific, and worth a reader’s time.
What makes a LinkedIn article tool worth using
LinkedIn articles are a funny middle ground. They are longer than posts, but they still need a point, a readable structure, and a reason for the reader to keep going. A good tool for this job does not just generate text. It helps with one of four things:
- Clarifying the angle so the article has a point instead of a mood.
- Building structure so the piece does not wander like a hallway with no doors.
- Speeding up drafting without flattening the voice into corporate oatmeal.
- Sharpening the edit so the final article sounds intentional, not assembled under duress.
That matters because LinkedIn still rewards clarity more than theatrics. The platform is not asking for literary fireworks. It is asking for useful thinking in a format people can skim, trust, and act on. LinkedIn’s own publishing guidance frames articles as a way to share insight and expertise, which means the tool stack should help with substance first, polish second.
For the broader writing system around this topic, the parent guide on LinkedIn articles is the place to start, and the companion guide on how to write better LinkedIn articles covers the craft side in more detail.
A lean AI stack for LinkedIn articles
You do not need twelve tools to write one solid article. In practice, a lean stack usually has four jobs:
- Research: gather facts, examples, and source material.
- Draft: turn the angle into a readable first pass.
- Edit: tighten phrasing, cut fluff, and improve flow.
- Repurpose: turn the article into posts, hooks, notes, or follow-up content.
The rest is optional, and optional is where tool stacks usually become expensive hobbies.
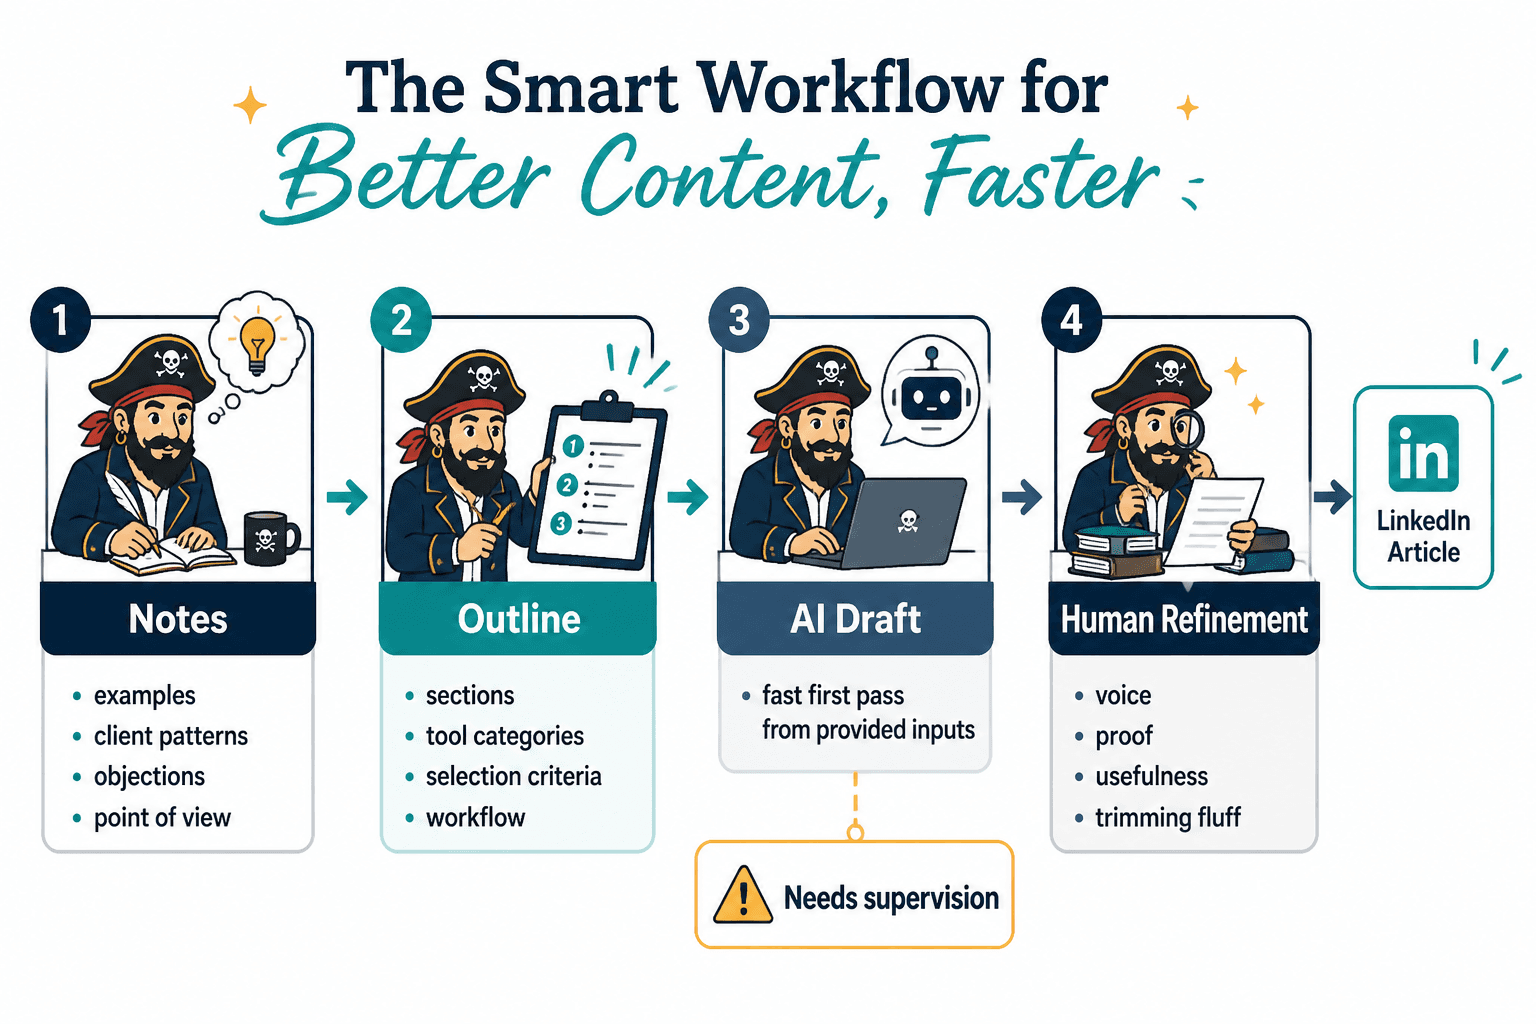
1. Research tools
Research tools help you avoid writing a confident-sounding article that collapses the moment someone checks a basic claim. For LinkedIn articles, that usually means tools that can summarize sources, find supporting context, and help you compare angles quickly.
Good options here tend to include AI research assistants and keyword tools. The first help you explore a topic faster. The second help you understand what readers are actually searching for or talking about around the subject.
- Use research tools for: topic scans, source summaries, competitor angle checks, and keyword discovery.
- Do not use them for: outsourcing judgment, copying weak source material, or inventing claims because the draft needs “more authority.”
If your article is meant to support a business goal, research tools should also help you identify the commercial intent behind the topic. That way the article does not just inform; it points somewhere useful.
For a more focused look at that side of the workflow, see best AI writing tools and SEO-research tools for LinkedIn articles.
2. Drafting tools
Drafting tools are best when they turn a blank page into a workable first draft without forcing you to wrestle every sentence from scratch. They are especially useful for opening sections, rough transitions, and versions of an idea you already know but have not yet organized.
The strongest use case is not “write the whole article for me.” It is “give me enough structure that I can think in paragraphs instead of in panic.”
- Use drafting tools for: hooks, rough outlines, first-pass body copy, and alternate phrasing.
- Check for: vague claims, generic filler, overlong intros, and sentences that sound like they were approved by committee.
A useful drafting tool should make revision easier, not harder. If it keeps producing text that you have to unlearn before you can improve it, the tool is saving you five minutes and costing you thirty.
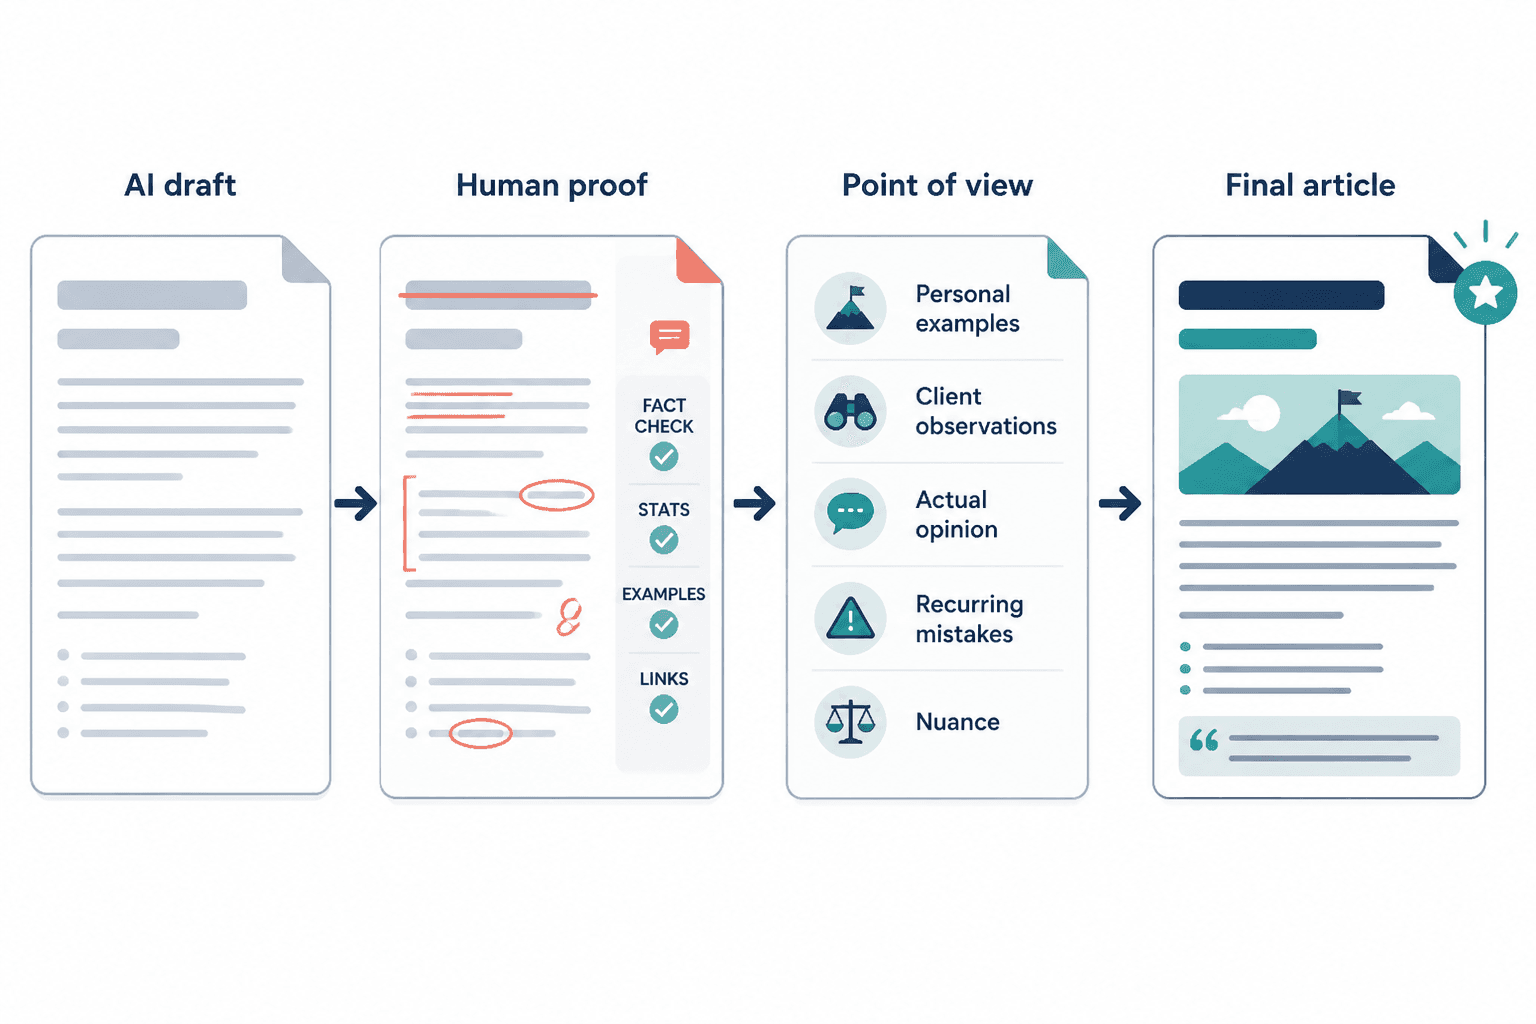
3. Editing and rewriting tools
Editing tools are where a lot of the value shows up, because the first draft usually fails in the same few ways: it is too long, too fuzzy, or too proud of itself. Rewriting tools help you shorten, clarify, and reframe without starting over.
This is the stage where a human voice matters most. AI can clean up syntax and improve flow, but it cannot reliably tell whether the article actually says something worth saying. That decision still belongs to the writer.
- Use editing tools for: tightening paragraphs, reducing repetition, improving transitions, and varying sentence structure.
- Use human review for: tone, examples, business relevance, and whether the point is sharp enough to justify the length.
A practical rule: if a rewrite makes the prose smoother but weaker, reject it. Clean is not the same thing as clear.
4. Outline and template tools
Template tools are underrated because they stop the article from turning into a formless “thoughts on a topic” pile. The right template gives the piece a job. That could mean problem → mistake → fix, before → after → lesson, opinion → proof, or a more direct framework structure.
Templates are especially useful when the topic is strong but the shape is not. They give the article a spine so the reader knows where it is going and why each section exists.
- Use templates for: structure, section planning, repeatable article formats, and faster outlining.
- Avoid: using the same template every time until the writing starts sounding like it was generated by a very organized vending machine.
If you want the template side in more detail, the companion article on best templates and tools for LinkedIn articles walks through the most useful structures and when to use them.
5. Repurposing tools
Repurposing tools take the article and turn it into other useful assets: short posts, hooks, quote cards, internal notes, or a follow-up angle. This matters because a good LinkedIn article should not be treated like a one-and-done artifact. It should feed the rest of your content system.
That said, repurposing only works when the original article has a clear point. If the source piece is muddy, the repurposed version will just be muddy in a smaller font.
- Use repurposing tools for: extracting key points, generating post variations, creating teaser copy, and building follow-up ideas.
- Do not use them for: stretching one weak article into six weak assets and calling it a strategy.
How to choose the right tool for your workflow
The best tool is the one that removes your actual bottleneck. That sounds obvious until people buy software for problems they do not have.
- If research is slow: start with a research assistant or keyword tool.
- If blank pages are the problem: prioritize drafting support.
- If the writing exists but feels clumsy: use editing and rewriting tools.
- If you need a repeatable format: use templates and outline tools.
- If distribution is the bottleneck: use repurposing tools that make the article useful after publication.
That approach keeps the stack lean. It also keeps you from buying an all-in-one platform when you really needed a cleaner outline and a better sentence cut in half.
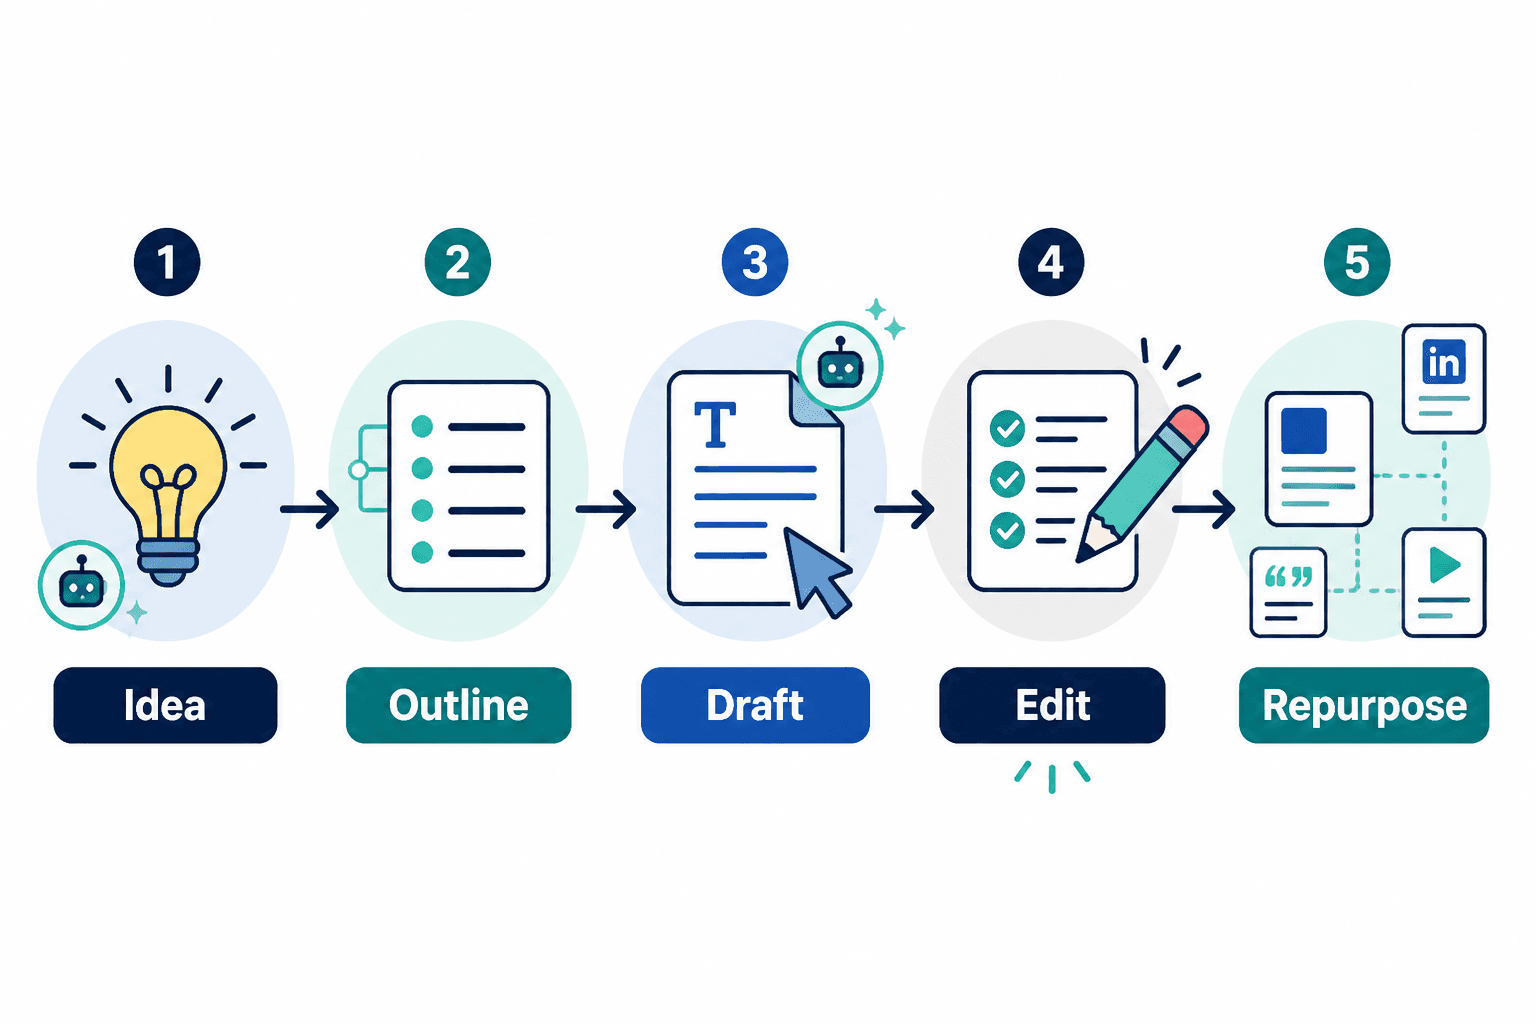
A practical workflow from idea to publish
Here is a simple workflow that works well for LinkedIn articles without pretending the process is glamorous:
- Pick the angle. Decide what the article is actually trying to help with.
- Research the topic. Pull in sources, examples, and supporting context.
- Choose a structure. Use a template or outline that fits the purpose.
- Draft quickly. Get a rough version on the page before the inner editor starts filing reports.
- Edit for clarity. Cut repetition, sharpen claims, and improve transitions.
- Repurpose the final piece. Pull out post ideas, hooks, and follow-up content.
This is also where a simple visual workflow can help. The best setup is usually not the one with the most features. It is the one that makes the next step obvious.
Common mistakes to avoid
- Letting AI write the whole article unchanged. That is how you end up with polished emptiness.
- Using research tools as a substitute for thinking. Sources are inputs, not conclusions.
- Overusing templates. Structure should support the article, not trap it in a cardboard box.
- Choosing tools before defining the bottleneck. Buying software is not a strategy.
- Skipping the final edit. LinkedIn readers notice when a piece feels assembled rather than written.
LinkedIn’s own publishing ecosystem changes over time, and so do the tools around it. That is another reason to keep the workflow simple. Fewer moving parts are easier to maintain, and maintenance is what keeps a “good enough” system from becoming yesterday’s screenshot collection.
Related reading
- Best Templates and Tools for LinkedIn Articles
- Best AI Writing Tools and SEO-Research Tools for LinkedIn Articles
- How to Turn LinkedIn Articles Into More Leads or Sales
- How to Write Better LinkedIn Articles
Bottom line
The best AI tools for LinkedIn articles are not the ones that produce the flashiest draft. They are the ones that make your process cleaner: better research, faster outlining, less painful drafting, sharper editing, and useful repurposing after publication. Keep the stack lean, keep the human judgment in the loop, and let the tools handle the boring parts without letting them take over the point.