Recently, I found out some of my web pages didn’t look so great on Apple devices, so I picked up a late 2014 Mac Mini so I could have a device running Safari natively. Unfortunately, after upgrading it to the latest version of macOS, it was almost too sluggish to use. So started a long, misguided journey to carry out one of the few upgrades available for this particular model of the Mini — adding a PCIe SSD.
Note that had I done a little more research before starting this adventure, I could have avoided a bunch of headaches. If your planning on doing a project like this but haven’t bought any hardware yet, please skip to my rant at the end of the article for some shopping advice. But if you have found yourself in possession of some components that aren’t playing nice together, read on.
Table of Contents
- Hardware
- Disk Utility doesn’t see the new drive
- Making a new partition
- How can an i5 processor run at 1.4ghz???
Hardware
The first sign that I was going to run into trouble was how smooth the hardware installation went. One of the reasons I chose to add an M.2 drive instead of replacing the spinny 2.5″ disk with an SSD, is that doing the latter seemed like a real pain on this model of Mini. Adding an M.2, on the other hand, was accomplished in just a few steps. I started out with this adapter that I found on my local version of eBay:
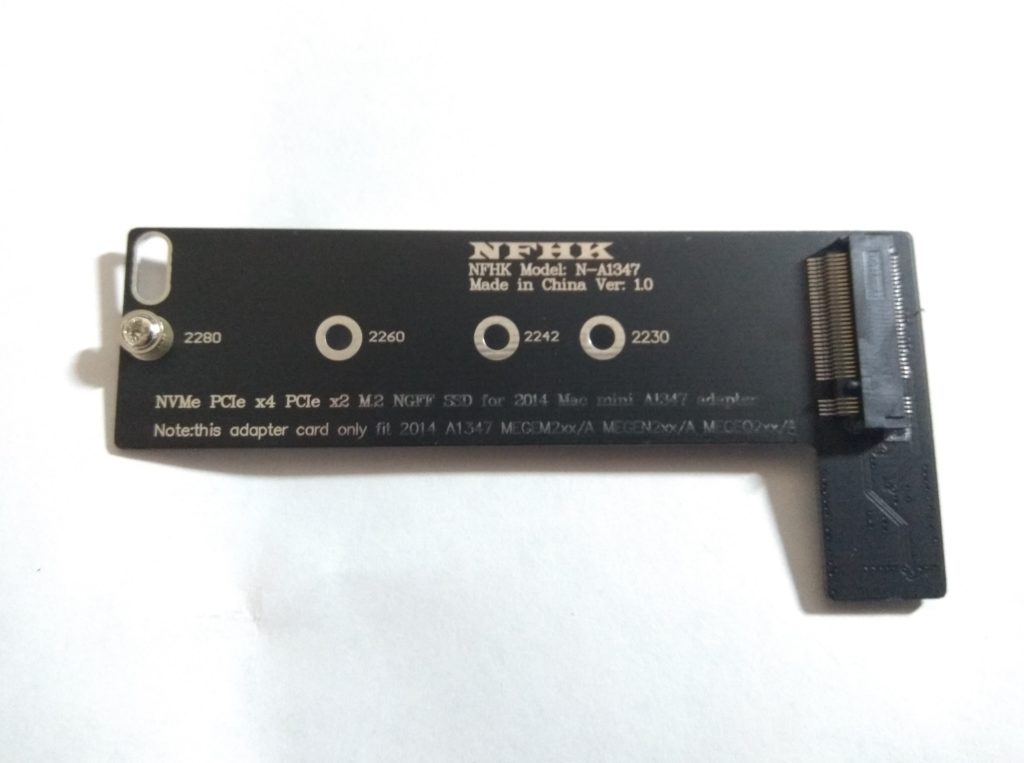
Things were looking good. The model number of my Mini is A1347, and it say[s] right there “this adapter only fit 2014 A1347…”. This is what it looks like after I installed the hard drive that I chose based on its read/write speed vs price ratio (Crucial P1):

Installing the SSD assembly in the Mini is as simple as popping off the round black plastic bottom and removing six Torx screws. Carefully lift the edge of the metal cover that is furthest away from the WIFI antennae away from the case (the antennae wire is still attached).
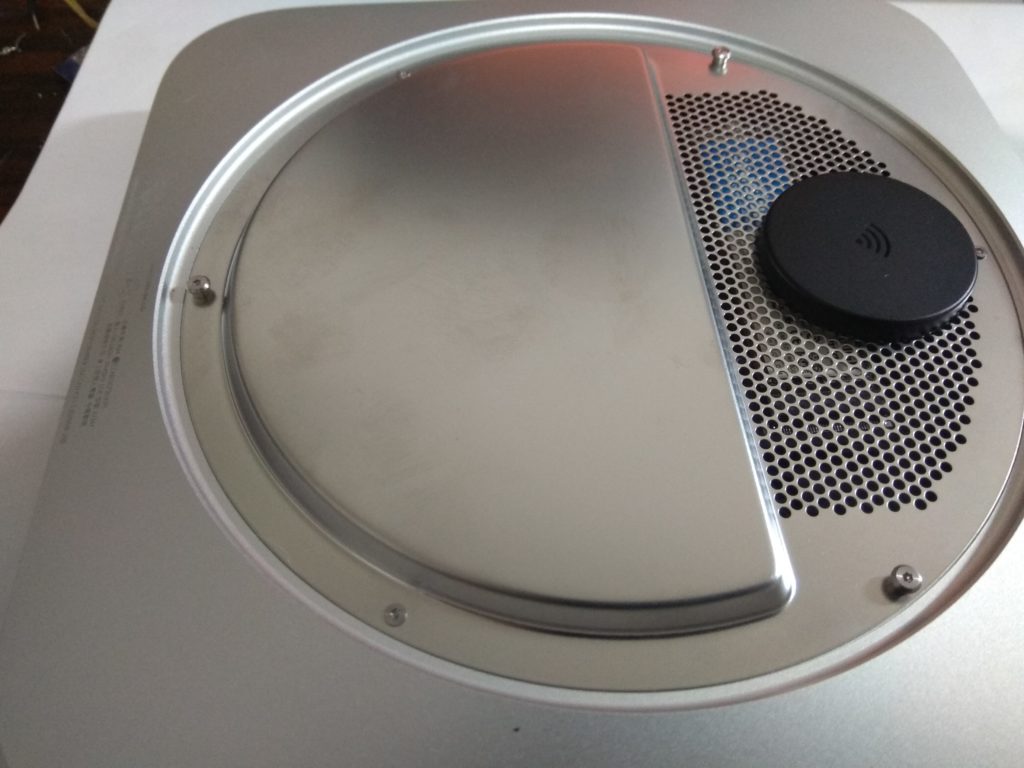
Inside the case, you will see the PCIe plug as pointed out in the photo below by red arrows. Looking at the blue arrows, there is a hole to screw the SSD adapter to the case, but the hole in my adapter didn’t line up with it without some bending. Luckily, the foam on the bottom of my adapter included adhesive (green arrow).

With the new hard drive firmly stuck in place, it’s time to put the covers back on and take it for a test drive! This was so easy!
Disk Utility doesn’t see the new drive
To see the new hard drive, click the Launchpad icon in your dock, and look for Disk Utility in the Other folder. Then click the view button in the upper-left-hand corner, and click devices.
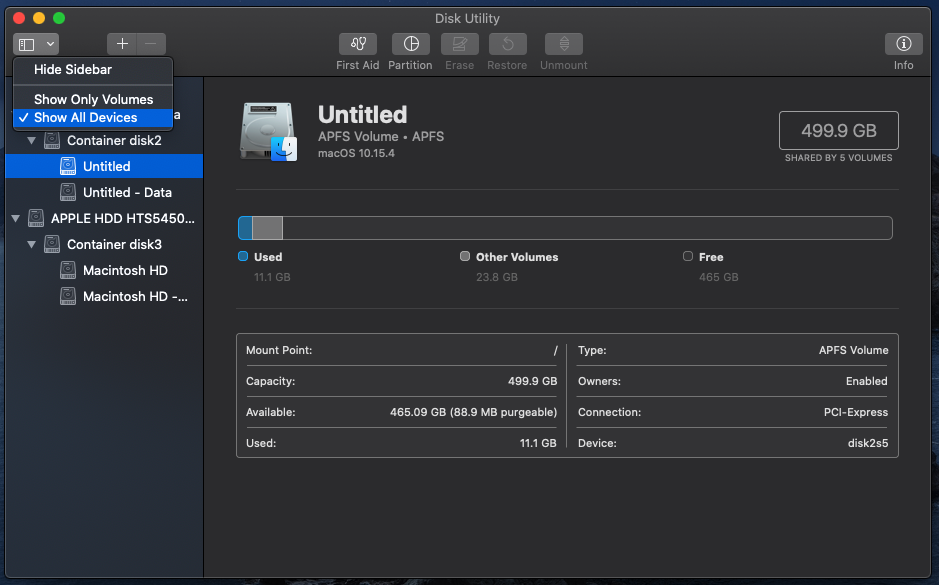
If you see your new drive, congratulations! Your hard drive was probably one of the ones that are fully compatible with macOS. If you don’t see the drive, as it was in my case, don’t give up hope! Formatting the drive might get your Mini to see the new disk. All you need is a PC with a real operating system and an empty M.2 slot or an external M.2 enclosure. After you have found a way to connect the drive to a PC, you can follow the Windows instructions below or jump to instructions for Linux.
Windows
I followed a guide that I found here.
There are several Windows apps out there that can format drives to an Apple file system, but I prefer to use the all-powerful and automatically installed Diskpart. To open Diskpart, first, open a command prompt by pressing Windows+R. Then open the command prompt with:
cmd.exePress Enter. In the command prompt enter:
diskpartA dialog will pop up asking if you want this program to make changes to your computer. Say yes, then click yes and Diskpart will open in a new window. First, you need to find out the disk number of the new drive. This can be accomplished by entering:
list diskYou should see something like the following.
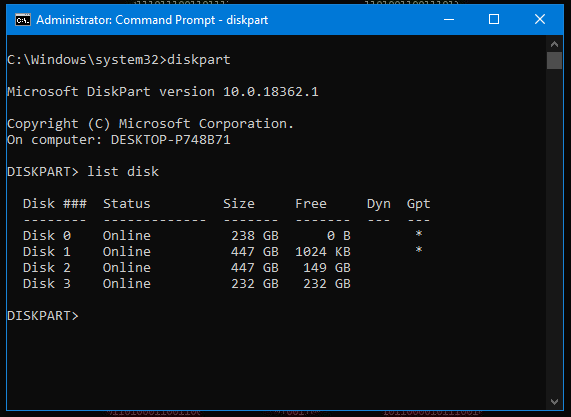
This next step is very important. If you don’t choose wisely, you might accidentally format the wrong disk, and lose your data, your OS, or maybe your will to live. If you aren’t sure which drive to use, you can eject the new drive, and run the previous command again to see which one disappeared. Once you are are sure you know which disk is the one you want to format it, select it with the following command. REPLACE THE # WITH THE CORRECT DISK NUMBER!
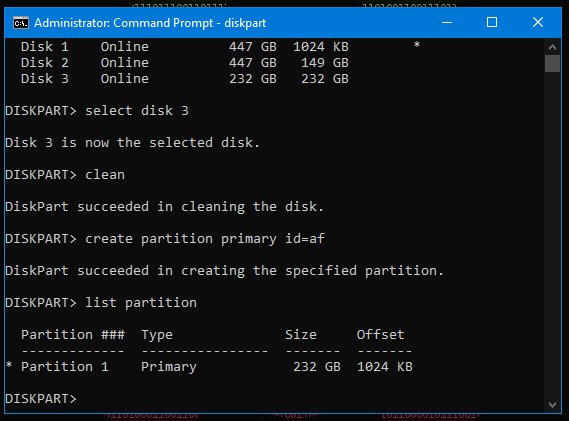
select disk #Sorry for yelling, but I can’t count the number of times I’ve blindly cut and paste commands from a tutorial and wondering why I get errors when I was supposed to replace bits of the command with my own info. Anyways, moving on. Now clean the disk and make a new partition with the following commands.
cleancreate partition primary id=afI’ve used Diskpart more than a few times in the past, but this was the first time I had seen the ‘id=af’ parameter. I Googled around a bit and didn’t find a clear explanation, except that whatever follows the id tag lays out block sizes, etc. I assume ‘af’ stands for Apple filesystem. Moving on. If there isn’t any smoke coming out of the back of your computer, check to see that the partition appears with the following.
list partitionAnd the partition should be listed.
Finally, select the partition, mark it active, and exit Diskpart.
select partition 1activeexit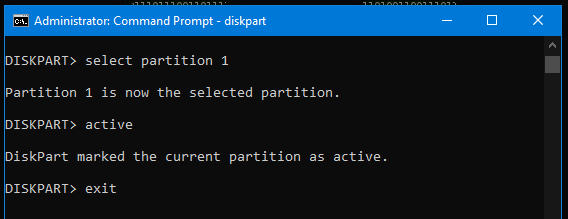
At this point, you can eject the SSD or power off your PC and remove the drive, and move on to the next step.
Linux
Usually, we carry out tasks with a shiny GUI in Windows, and terminal commands in Linux. However, for this project, I recommend the opposite. But don’t worry, the program of choice for making an Apple filesystem disk, GParted, isn’t included with every distro of Linux, so you might still be able to fire up that terminal! I’m running Ubuntu, and thus use the APT package manager. If you are using a different package manager, please change the following to match your system. First, if you haven’t checked for updates lately:
sudo apt-get updateThen install GParted and the package that allows it to use the HFS+ format. HFS+ is not the latest Apple file system, but your Mini will recognize it and it is the most recent one that can be used by GParted. Run the following:
sudo apt-get install -y gparted hfsprogsThen launch GParted from your application launcher or with the following command:
sudo gpartedYes, you must run it as sudo. That’s because if you make a wrong move you can really mess your system up. As long as you get the next step right, though, you won’t have any problems. In the drop-down menu at the top-right corner of GParted, select the disk you want to format.
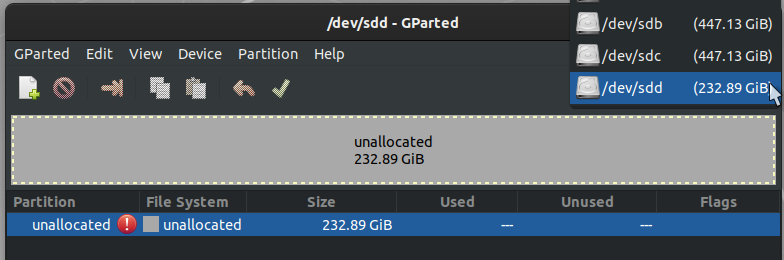
Hopefully, you will be able to judge which one it is by its capacity and since this a new drive, it will show up as unallocated. It usually is the last one, but if you are not sure, eject the new drive and unplug it to make sure. Next, from the Device menu, select Create Partition Table.
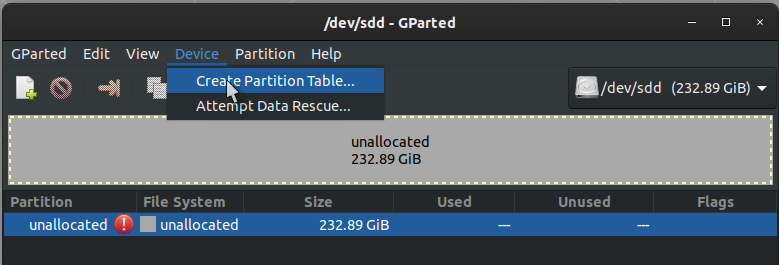
Select mac as the partition table type. This is the point where you won’t be able to recover your system if you selected the incorrect hard drive, so cross your fingers and click Apply.

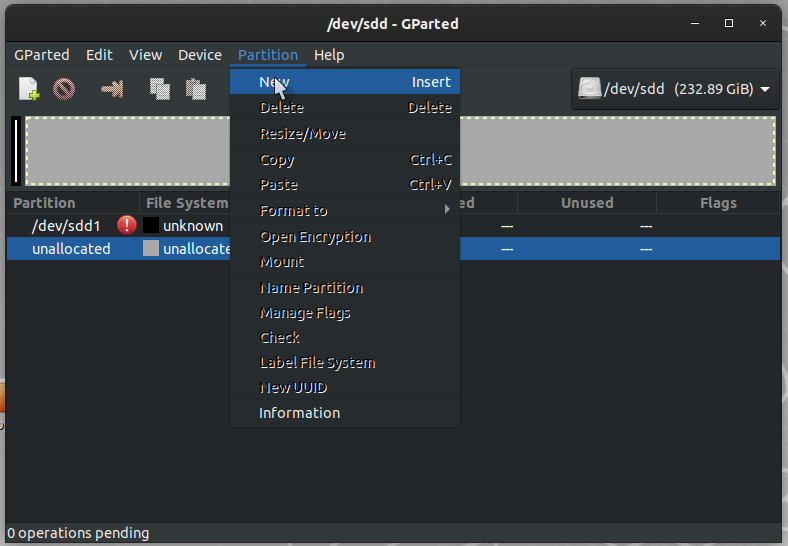
The thing about accidentally deleting your system partition is that your OS is loaded in RAM, and you can keep going for a while thinking everything is OK. I’m sure that didn’t happen to you. The next step is to create a new partition:
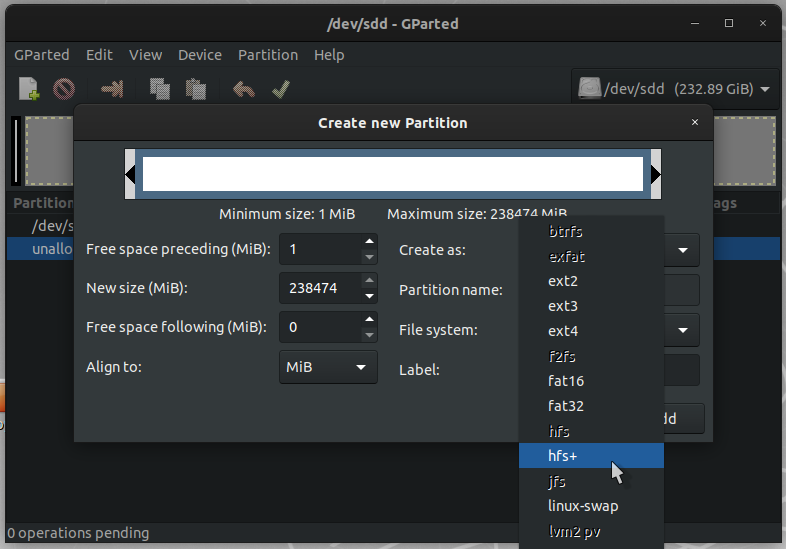
Select HFS+:
And apply changes by clicking:
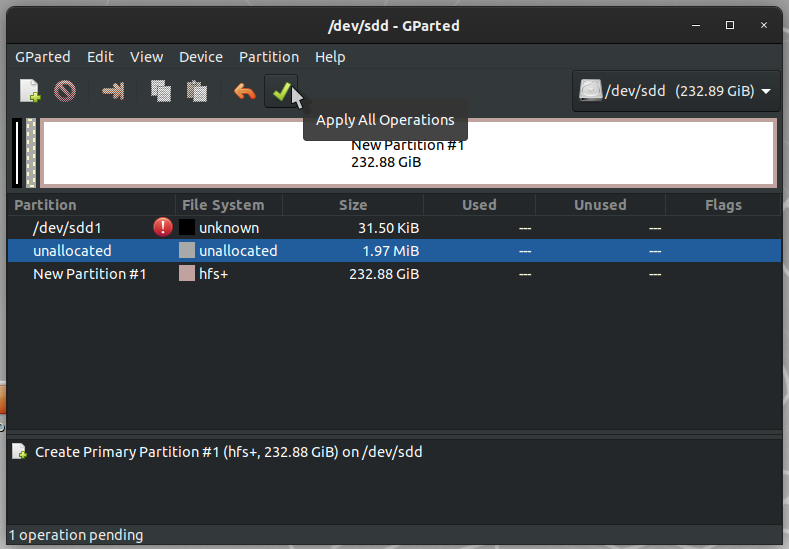
And that’s it! After a short wait, your SSD is ready to be re-installed in your Mini.
What now?
Hopefully, your new disk now shows up in Disk Utility. However, as indicated by the warning message about your Mini not being able to read the disk you may or may not have gotten, the disk is not ready to go yet.
I do have screenshots for this part, but I decided that because macOS is such an intuitive, user-friendly OS, I would save everyone’s bandwidth. All you need to do is open Disk Utility, right-click on the new hard drive (it should be a long string of numbers and letters, anything but ‘APPLE HDD’), and select Erase. Give the volume a new name and click Erase. After that finishes, you can right-click on the new volume and select Covert to APFS.
From here, the drive is ready to use as you see fit. If you want it to speed up your user experience though, you will have to move macOS to the new drive. The way to accomplish this will vary from user to user. In my case, I had just started using this machine, so a fresh install via USB installer was convenient. If you want to migrate an established install, there a restore option might be more suitable.
How can an i5 processor run at 1.4ghz?
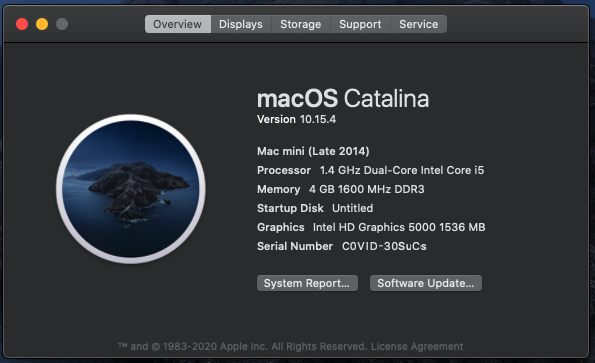
This Mac Mini was definitely an impulse buy for me. As I said at the top of the page, I needed something that could run Safari to view some web pages I had been working on, and not wanting to trust a simulator, I ran straight to Shopee (an Asian version of eBay) and bought the cheapest Mini I could find. All of the listings showed the CPU as being an i5, but none of them said which model of i5, but I said to myself, “Self, it’s an i5! It will have plenty of horsepower for what I want it for! Two cores minimum, running somewhere between 2.5ghz and 3.5ghz.”
The other thing I noticed is that the 2012 model of the Mini was selling for a slightly higher price. I didn’t notice it too hard to save thirty bucks though, and went ahead and ordered the 2014 model. After I upgraded it to Catalina (the latest version of Xcode wouldn’t run on High Sierra) and started a simulation of an iPhone, I noticed that everything was a little sluggish.
So, I opened a terminal checked the system resources with the following command:
topThis is what I saw:
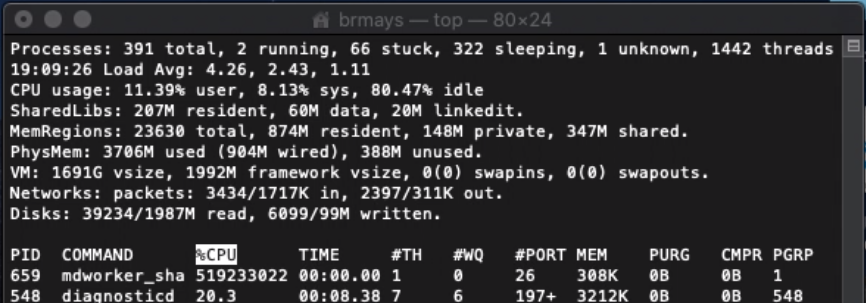
The first thing I saw was all the stuck processes. I had never seen that before, not even on a Pi Zero. The second thing was the high load average. This i5 is a dual-core, so ideally I’d like to see a load of 2 or less. Weirdly, the CPU was barely doing work. It seems the bottleneck was being caused by a shortage of memory. Unfortunately, this RAM is not user-upgradable on this model of Mini. So, my only hope was to make the virtual memory faster. That’s when I decided to try and put an SSD in this cute little beast.
The 2012 model is fully upgradable! And it has a 2.5ghz i5! Sure, it is a third-generation chip instead of the 2014 model’s fourth-generation, but that is a pretty big difference in clock speed. But the ability as a user to add more RAM is the reason the 2012 model is still the winner for a cheap, second-hand Mac Mini.
You might also be interested in reading about creating an Arduino OBS recording sign.